Torrent Suite SoftwareAdministration Guide
Torrent Suite Software space on Ion Community
Configure Users
The
Users
dialog provides for creating or modifying user accounts to access Torrent Suite Software using the Torrent Browser:
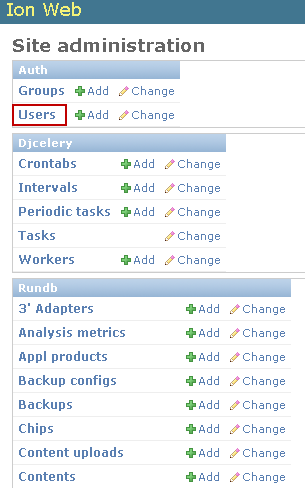
Add a User
-
Click
Add
on the
Site administration
menu for
Users
.
-
Enter a Username and Password ; enter the password twice to confirm:
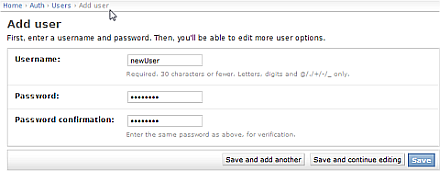
-
Click the wanted save option. Clicking
Save
permits you to provide additional user information using the
Change user
dialog, as follows.
-
In the Personal info dialog, optionally, enter a
First name
,
Last name
and
E-mail address
:

-
(Optional) In the Permissions dialog, check the Active , Staff status and Superuser status checkbox(es), as needed, and select the wanted User permissions :
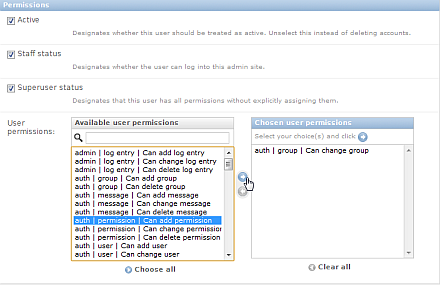
Checkbox
Description
Active
Designates whether or not this user is treated as active. The recommended method is to uncheck this item rather than delete this account.
Staff status
Designates whether or not this user can login to this administration site.
Superuser status
Designates that this user has all permissions without explicitly assigning them.
Select User permissions
There are three ways to specify User permissions :- Enter a string in the search window. All permissions matching the string are displayed, from which you may select permissions by highlighting the permission(s) and clicking the right arrow, in the center.
- Scroll through the permissions list. Highlight the wanted permission and click the right arrow to select the highlighted permission. Also hold down the control key to select more than one permission.
-
Click
Choose all
at the bottom of the dialog, to highlight all available permissions, and click the right arrow to select all permissions.
To deselect any permission, highlight selected permission(s), in the right window, or click Clear all followed by clicking the left arrow.
-
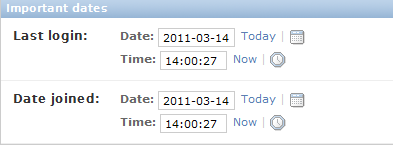
(Optional) Set the
Last login
and
Date joined
times, manually or using the calendar and clock icons. Click
Today
and
Now
to set the values to the current date and time:
-
(Optional) Click the plus sign to display the
Add group
dialog.

-
(Optional)Currently, the
Add group
dialog is the same as the
User permissions
dialog in step 5, above. Add the user to the group in the same way as described in step 5.
-
Choose one of the following
Save
options to complete adding the new user.

-
- Save and add another Choose this option to complete adding the new user, and return to the Add user page to another user.
- Save and continue editing Choose this option to complete adding the new user, and return to the Change user page.
- Save Choose this option to complete adding the new user. Clicking Save takes youto the Select user to change page.
Modify a User Entry
Use the following procedure to modify the information and permissions for an existing user:
-
On the
Users
line of the main
Site administration
menu, click
Change
.
-
On the
Select user to change
page, click the
Username
of the user you want to change.
Usernames can be filtered, selected to the right, according to: By staff status , By superuser status or By active status.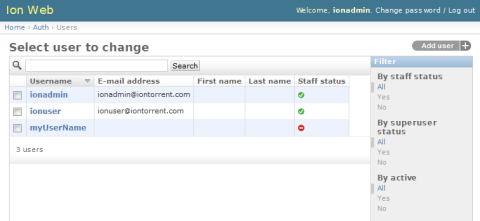
-
Use the Change user dialog to modify user information in the same way as described for adding a user, beginning in step 4 above.

- Choose one of the Save options at the bottom of the page to save your changes.
Delete a User Entry
Use one of the following procedures to delete an existing user.
Delete a Single User
-
In the
Users
line of the main
Site administration
menu, click
Change
.
-
On the
Select user to change
page, click the
Username
of the user to be deleted.
-
At the bottom-left of the user information page, click
Delete
.
-
Confirm that you want to delete the user by clicking
Yes, I'm sure
:

Delete Multiple Users
- In the Users line of the main Site administration menu, click Change .
- On the Select user to change page, check the checkbox for each of the users you want to delete.
-
Click the drop-down menu and select
Delete selected users
:

-
Click
Go
:

- Confirm the list of users you want to delete by clicking Yes, I'm sure .
-
On the
Select user to change
page, the list of users confirms your deletion(s).

 Torrent Suite™ Software Administration Guide
 Deploy Your System
 Prepare Your Site
 Install the Server
 Network Connectivity
 Update Torrent Suite™ Software
 Install Analysis Plugins
 Configure Torrent Suite™ Software
 Verify Functionality
 Manage Sequencer Settings from the Torrent Browser
 Monitor Free Disk Space
 Back Up and Restore Data
 Mount a USB Drive
 Boot Into Single-User Mode
 Install and Use a UPS
 Axeda® Remote System Monitoring (RSM)
 Configure Chips
 Configure Experiments
 Configure Global Configs
 Configure Users
 Approve User Account Requests
 Configure Basecaller Default Parameters
 Upgrade Your Torrent Server Ubuntu® Software
 View Network Settings
 Shutdown Server
 Use a Torrent VM to Evaluate a New Torrent Suite™ Software Release
 Update Server
 Update the Ion OneTouch™ Device
 Manage your SGE Cluster with QMON
 View System Support Diagnostics
 View Instrument Diagnostics

